Pure-FTPD Virtual FTP Users
Centmin Mod 1.2.3-eva2000.08+ and higher has added Pure-FTPD virtual FTP user support. Full example below with both SecureFX and Filezilla FTP/SFTP client configuration examples.
- Notes
- Enable TLS/SSL
- Other Firewalls
- Screenshots For SecureFX SFTPD Client
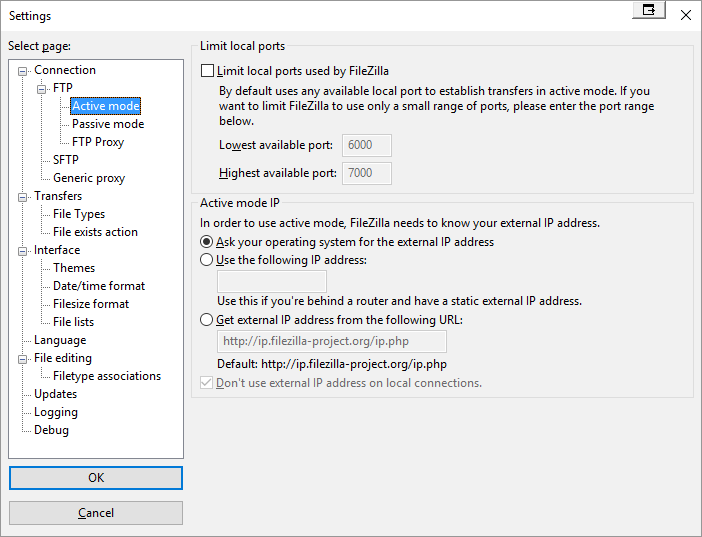
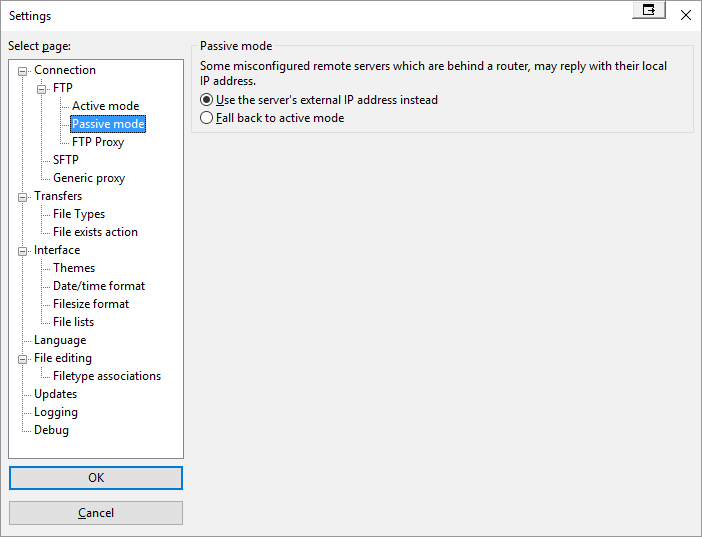
- Screenshots For Filezilla FTP/SFTP Client
- Pure-FTPD CSF Firewall Port Flood Protection
- How To Disable Pure-FTPD?
- How to Disable Pure-FTPD Forced TLS/SSL Encrypted Mode?
- Pure-FTPD Log File
- Change Pure-FTPD username or password
- How to re-create Pure-FTPD user for Vhost?
- Example
Notes
- This is not the full jailed/chrooted user preview setup I outlined but a much more basic workaround for now. So still not suited to full own shared hosting as it isn't fully isolated between virtual ftp user accounts. Still the purpose is for access by yourself or trusted folks. I wouldn't offer shared hosting to unknown users using this!
- If using Wordpress see note about Direct FS Method setting in wp-config.php
- You can enable support for automatic malware and virus scanning for ftp uploads if you install Centmin Mod maldet.sh addon. Full details here
- If you're ISP IP address is being blocked when connecting to Pure-FTPD via Pure-FTPD virtual FTP user, check out FAQ item 40.
Enable TLS/SSL
- I went one step further beyond just adding pure-ftpd virtual user support, I also enabled and forced TLS SSL only mode by creating a self-signed SSL certificate for pure-ftpd. So there's enforced encryption for more secure FTP connection.
- As such you need to set your FTP client to use FTP explicit SSL mode and enable and check Passive connections (PASV) and connect via your server's ip address for hostname and use FTP port 21 (not actually used in PASV mode with FTP TLS/SSL).
- You also have to disable in your FTP client SSL validation as a self-signed certificate was used.
- Note passive ports if needed to be set in FTP client are in range between
3000 to 3050forCentmin Mod 123.08stableor30001 to 50011forCentmin Mod 123.09 beta and higheri.e. for Filezilla. Upgrades to Centmin Mod 123.09 beta and higher auto reconfigure CSF Firewall to the larger passive TCP ftp passive port range. However, if you are using a web host with their own internal firewall in place, you may need to whitelist these respective passive port ranges for TCP protocol (either3000 to 3050or30001 to 50011). Otherwise, you will not be able to connect to your server via Pure-FTPD details provided by Centmin Mod.
Other Firewalls
- Note passive TCP ports in range between
3000 to 3050forCentmin Mod 123.08stableor30001 to 50011forCentmin Mod 123.09 beta and higherare required to be open for Pure-ftpd server to accept connections. CSF Firewall installed by Centmin Mod takes care of this on server side. - However, if you have other firewalls between your connecting computer and the Centmin Mod server, they may block connections as well. Some web hosts such as Amazon AWS EC2, Google Cloud Compute, Vultr and OVH (OVH Gaming servers) may have their own firewall in front of your server which you can either turn off or configure to whitelist the required TCP ports. CSF Firewall config file
/etc/csf/csf.confhas a list of default ports in comma separated listing that are whitelisted for variablesTCP_IN,TCP_OUT,TCP6_IN,TCP6_OUT,UDP_IN,UDP_OUT,UDP6_INandUDP6_OUTthat you can reference. If your local PC or router has restricted ports, you may also need to whitelist them at that level as well. - For Vultr Firewall, there is a guide for using Vultr API to replicate CSF Firewall minimum ruleset for inbound access here.
Screenshots for SecureFX SFTPD Client
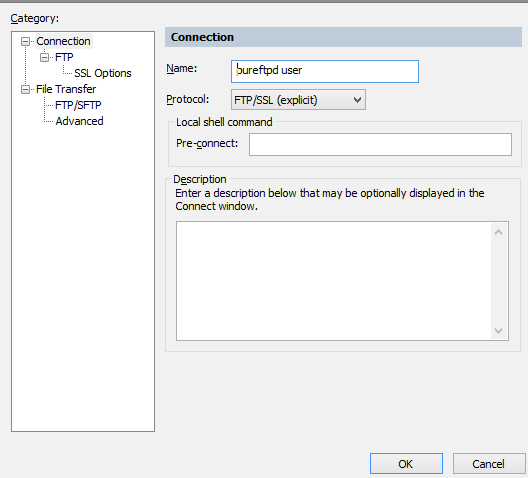
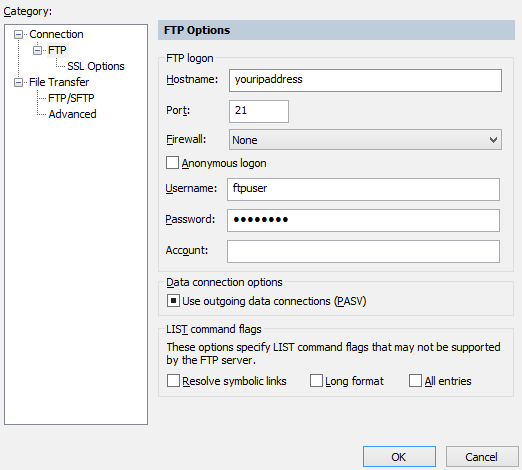
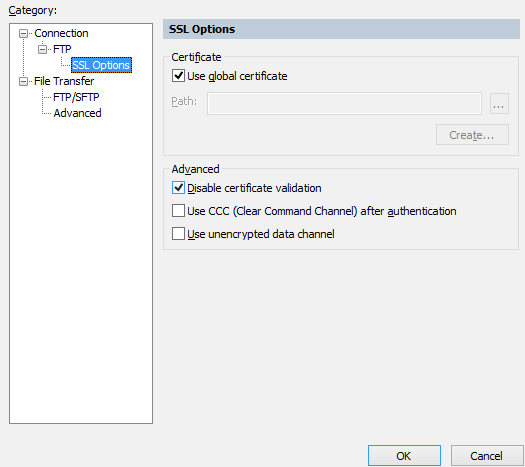
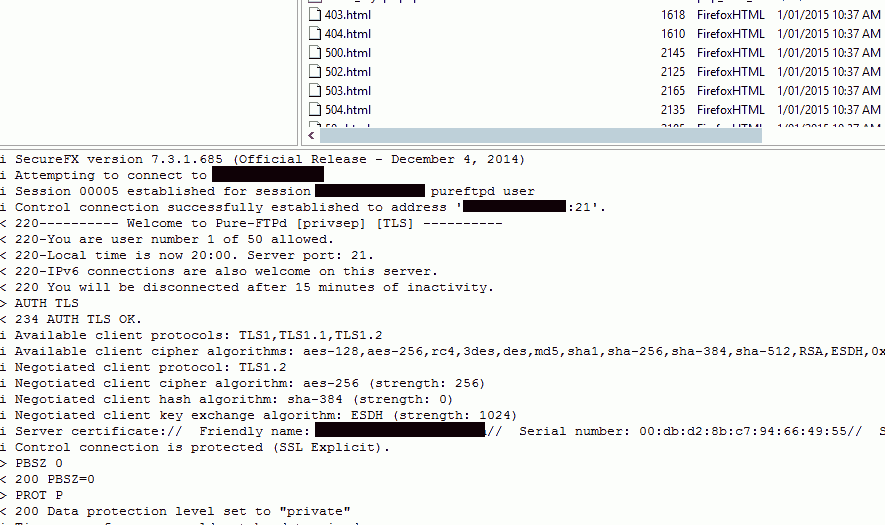
Screenshots for Filezilla FTP/SFTP Client
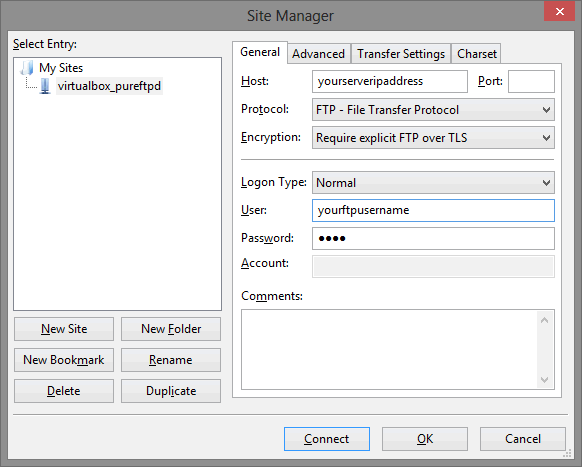
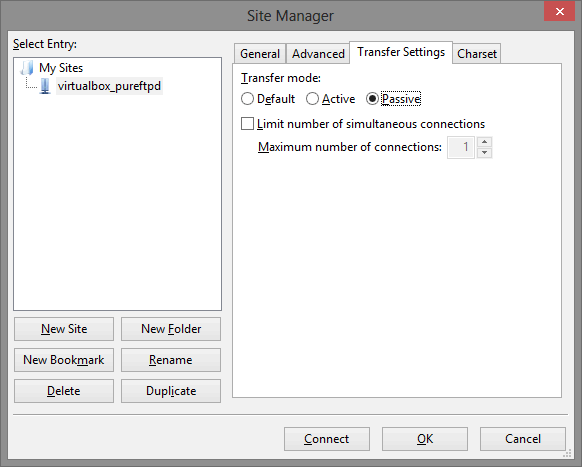
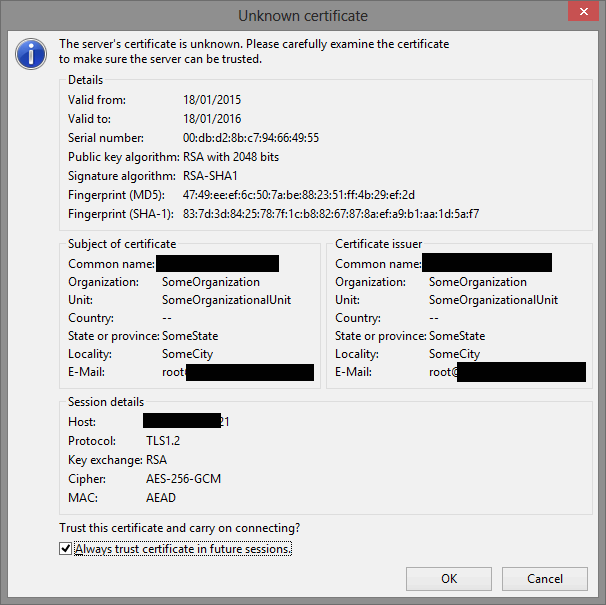
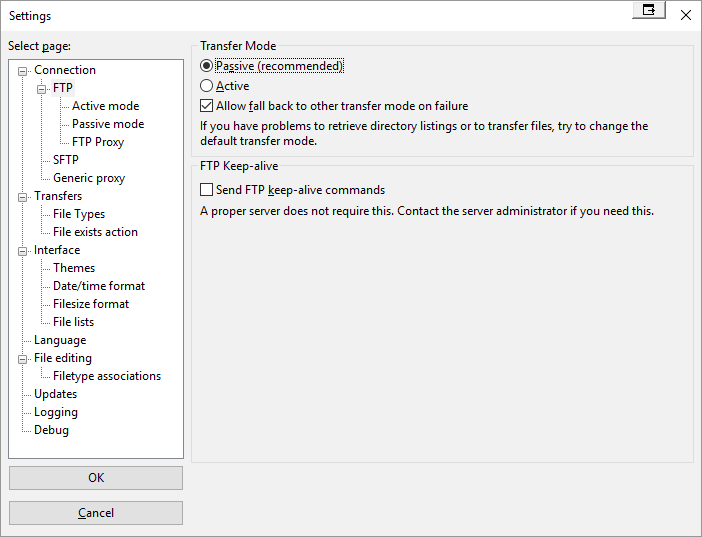
Pure-FTPD CSF Firewall Port Flood Protection
If you are having pure-ftpd disconnection or connection issues when uploading many files at once, it could be CSF Firewall's DDOS protection for Port Flooding in play. To check you can follow the guide written here
How to Disable Pure-FTPD?
On fresh Centmin Mod .08 installs centmin.sh has a new option PUREFTPD_DISABLED=n. Before initial install, change that to PUREFTPD_DISABLED=y to disable pure-ftpd service post initial install. It's still installed but disabled after install and nginx add vhost menu option 2 in centmin.sh automatically detects PUREFTPD_DISABLED=y and doesn't prompt or do any pure-ftpd virtual ftp user routines and skips those for old method prior to pure-ftpd.
For existing installs to disable Pure-FTP, just set in persistent config file at /etc/centminmod/custom_config.inc the variable PUREFTPD_DISABLED=y and stop the pure-ftpd service:
service pure-ftpd stop
chkconfig pure-ftpd off
To re-enable:
service pure-ftpd start
chkconfig pure-ftpd on
How to Disable Pure-FTPD Forced TLS/SSL Encrypted Mode?
On fresh Centmin Mod .08 installs, Pure-FTPD is configured for encrypted TLS/SSL connections only via self-signed certificate so no plain text connections allowed. However, if you are having issues, you can disable the forced TLS/SSL requirement by editing /etc/pure-ftpd/pure-ftpd.conf config file and changing TLS 2 to TLS 1 - keep the exact spacing format below just in case in future centmin.sh does some auto magic for changes. However, for security reasons I highly recommend you DO NOT disable TLS/SSL encrypted connections!
From
# This option can accept three values :
# 0 : disable SSL/TLS encryption layer (default).
# 1 : accept both traditional and encrypted sessions.
# 2 : refuse connections that don't use SSL/TLS security mechanisms,
#     including anonymous sessions.
# Do _not_ uncomment this blindly. Be sure that :
# 1) Your server has been compiled with SSL/TLS support (--with-tls),
# 2) A valid certificate is in place,
# 3) Only compatible clients will log in.

TLS                      2
To:
# This option can accept three values :
# 0 : disable SSL/TLS encryption layer (default).
# 1 : accept both traditional and encrypted sessions.
# 2 : refuse connections that don't use SSL/TLS security mechanisms,
#     including anonymous sessions.
# Do _not_ uncomment this blindly. Be sure that :
# 1) Your server has been compiled with SSL/TLS support (--with-tls),
# 2) A valid certificate is in place,
# 3) Only compatible clients will log in.

TLS                      1
then restart pure-ftpd service
service pure-ftpd restart
Pure-FTPD Log File
You can find the Pure-FTPD log file at /var/log/pureftpd.log. On some systems it's logged to system log at /var/log/messages so you can filter using grep. Like showing the last 25 lines of the file:
grep pure-ftpd /var/log/messages | tail -25
Change Pure-FTPD username or password
Centmin Mod auto generated Nginx vhosts have an accompanying Pure-FTPD virtual ftp username and password generated as well. You can use pure-pw command to change the ftp username and password. The pure-pw manual is here and http://download.pureftpd.org/pub/pure-ftpd/doc/README.Virtual-Users
list all pure-ftpd created virtual FTP users
pure-pw list
to delete virtual FTP user
pure-pw userdel FTPUSERNAME
pure-pw mkdb
change virtual FTP user's password
pure-pw passwd FTPUSERNAME
pure-pw mkdb
show full details for an specific pure-ftpd virtual FTP user
pure-pw show FTPUSERNAME
How to re-create Pure-FTPD user for Vhost?
If you deliberately or accidentally deleted the auto generated pure-ftpd virtual FTP user for your Nginx vhost site, you can re-create it using below commands. For example if you deleted FTP user = YOURFTPUSERNAME for Nginx vhost site domain.com, you would use the following commands to re-create it - DO NOT set it higher than directory level at /home/nginx/domains/domain.com
pure-pw useradd YOURFTPUSERNAME -u nginx -g nginx -d /home/nginx/domains/domain.com
pure-pw mkdb
If it was subdomain.domain.com Nginx vhost:
pure-pw useradd YOURFTPUSERNAME -u nginx -g nginx -d /home/nginx/domains/subdomain.domain.com
pure-pw mkdb
Example
Sample centmin.sh menu option 2 add Nginx vhost output from Centmin Mod .08 beta below
--------------------------------------------------------
Centmin Mod 1.2.3-eva2000.08 - http://centminmod.com
--------------------------------------------------------
                   Centmin Mod Menu
--------------------------------------------------------
1).  Centmin Install
2).  Add Nginx vhost domain
3).  NSD setup domain name DNS
4).  Nginx Upgrade / Downgrade
5).  PHP Upgrade / Downgrade
6).  XCache Re-install
7).  APC Cache Re-install
8).  XCache Install
9).  APC Cache Install
10). Memcached Server Re-install
11). MariaDB 5.2/5.5 & 10.x Upgrade Sub-Menu
12). Zend OpCache Install/Re-install
13). Install ioping.sh vbtechsupport.com/1239/
14). SELinux disable
15). Install/Reinstall ImagicK PHP Extension
16). Change SSHD Port Number
17). Multi-thread compression: pigz,pbzip2,lbzip2...
18). Suhosin PHP Extension install
19). Install FFMPEG and FFMPEG PHP Extension
20). NSD Re-install
21). Update - Nginx + PHP-FPM + Siege
22). Add Wordpress Nginx vhost + WP Super Cache
23). Update Centmin Mod Code Base
24). Exit
--------------------------------------------------------
Enter option [ 1 - 24 ] 2
--------------------------------------------------------

---------------------------------------------
Enter vhost domain name you want to add (without www. prefix): domain1.com
Create FTP username for vhost domain (enter username): ftpuser4
Create FTP password for ftpuser4 (enter password): pass

FTP username you entered: ftpuser4
FTP password you entered: pass

Password:
Enter it again:

---------------------------------------------
service nginx reload
nginx: the configuration file /usr/local/nginx/conf/nginx.conf syntax is ok
nginx: configuration file /usr/local/nginx/conf/nginx.conf test is successful
Reloading nginx:                                           [  OK  ]
service pure-ftpd restart
Stopping pure-ftpd:                                        [  OK  ]
Starting pure-ftpd:                                        [  OK  ]

---------------------------------------------
FTP hostname : ipaddress
FTP port : 21
FTP mode : FTP (explicit SSL)
FTP Passive (PASV) : ensure is checked/enabled
FTP username created for domain1.com : ftpuser4
FTP password created for domain1.com : pass
---------------------------------------------
vhost for domain1.com created successfully
vhost conf file for domain1.com created: /usr/local/nginx/conf/conf.d/domain1.com.conf
upload files to /home/nginx/domains/domain1.com/public
vhost log files directory is /home/nginx/domains/domain1.com/log

Current vhost listing at: /usr/local/nginx/conf/conf.d/

Jan 1   00:37   798    ssl.conf
Jan 1   00:37   1.1K   demodomain.com.conf
Jan 1   00:37   1.4K   virtual.conf
Jan 17  21:53   1.3K   domain1.com.conf
---------------------------------------------

